 Have you ever looked at a set of building blueprints and struggled to visualize the final product? Or perhaps you’ve created a 3D model of a building before, but it just didn’t look quite right? In this guide, we’ll walk you through the process of turning a set of blueprints into a stunning 3D model that looks just like the real thing.
Before we get started, let’s go over what a blueprint is.
A blueprint is a detailed technical drawing that shows the layout and dimensions of a building or other structure. Blueprints are used in the construction industry to help builders and contractors understand the design of a building and to create a step-by-step plan for its construction.
Blueprints are typically drawn to scale, meaning that the dimensions of the objects shown on the blueprint are in proportion to their actual size. This allows builders and contractors to get a sense of the size and layout of the building and to create a detailed construction plan.
Blueprints typically include a variety of details, such as the locations of walls, doors, windows, and other architectural elements. They may also include notes and specifications about the materials and techniques that should be used in the construction of the building.
Blueprints are often used in conjunction with other types of construction documents, such as building plans, elevations, and sections, which provide additional details and views of the building.
Step 1: Setting up your project
Getting Started

Before you start modeling, it’s important to properly set up your project. This includes organizing your files, setting up your workspace, and deciding on any additional features or details you want to include in your model.
To get started, gather all of the relevant documents and files you will need, such as blueprints, elevation plans, and any reference images or materials lists. Create a new project folder on your computer and save these documents inside it. This will help keep everything organized and easy to access.
Gather Relevant Documents
The relevant documents and files that you might need for a building design project could include:
-
- Blueprints: Detailed drawings of the building’s layout, showing the dimensions and placement of walls, doors, windows, and other features.
- Elevation plans: Drawings that show the front, side, and rear views of the building, as well as any architectural details.
- Materials list: A list of the materials and finishes that will be used on the building, including things like siding, roofing, and interior finishes.
- Reference images: Photos or drawings of the building or similar buildings that can be used as a reference for modeling.
- Any other relevant documents or files, such as project specifications, renderings, or sketches.
Gathering all of these documents and files at the start of the project will help you have everything you need in one place and make it easier to refer back to as you work.
Set Up Your Software Workspace
Next, launch your 3D modeling software and set up your workspace. This might include adjusting the interface to your preferences, creating custom toolbars or palettes, and setting up any plug-ins or add-ons that you plan to use.
Tips for Customizing Software Interface
The specific steps for customizing the interface of 3D modeling software will depend on the software you are using. However, here are a few general tips:
-
- Look for options to customize the layout of the interface. This might include things like adjusting the position and size of windows, creating custom toolbars or palettes, and rearranging the layout of the interface to your liking.
- Take advantage of any customization options for the color scheme or appearance of the interface. Many software programs allow you to choose from a range of pre-set color schemes or create your own.
- Set up any plug-ins or add-ons that you plan to use. These can add additional functionality to the software and make it easier to use.
- Consider creating custom keyboard shortcuts or macros to streamline your workflow.
Additional Features or Details for your 3D model
Finally, think about any additional features or details you want to include in your model to make it more realistic and accurate. Here are a few examples:
-
- Furniture: Depending on the specific project, you might want to include furniture and other objects in your model to give it a more lived-in look. This might include things like tables, chairs, couches, and beds.
- Lighting: Adding lighting to your model can help give it a more realistic appearance, especially if you are creating a model of an interior space. This might include things like lamps, overhead lights, and other fixtures.
- Landscaping: If you are modeling an exterior space, you might want to include landscaping details such as trees, shrubs, and grass.
- Interior finishes: For an interior model, you might want to include details such as wallpaper, flooring, and countertops to make the space look more realistic.
- Exterior finishes: For an exterior model, you might want to include details such as siding, roofing, and trim to give the building a more finished look.
- People: Depending on the purpose of your model, you might want to include people or other figures in your model to give it a sense of scale.
Step 2: Modeling the exterior of the building
Next, it’s time to start creating the actual 3D model. We recommend starting with the exterior of the building, as this will give you a good foundation to work from. Follow the blueprints closely, paying attention to details such as the number of stories, the placement of windows and doors, and the overall shape of the building.
Create the Shape of the Building

Here are the general steps you might follow to create the shape of a building in 3D modeling software:
-
- Start with a basic 3D shape that is close to the overall shape of the building. For example, if the building is rectangular, you might start with a cube. If it is more cylindrical, you might start with a cylinder.
- Adjust the size and proportions of the shape to match the dimensions of the building. You can use the blueprints or other reference materials to help you get the dimensions and proportions correct.
- Add additional shapes as needed to create the overall shape of the building. For example, you might add a cylinder to the top of a cube to create the shape of a dome.
- Use the tools in the software to refine the shape of the building. This might include things like smoothing out edges, adding curved surfaces, or creating more complex shapes.
Add Architectural Features
Next, add in any architectural features such as columns, eaves, and trim.
Exterior architectural features are elements of a building’s design that are visible from the outside and contribute to its overall appearance. Some examples of exterior architectural features are:
-
- Columns: Columns are vertical structural elements that support the weight of a building and can be decorative as well as functional. They can be made of materials such as wood, stone, or metal and can be finished in a range of colors and styles.
- Balconies: Balconies are exterior platforms that project from the walls of a building and can be used for a variety of purposes. They can be made of materials such as wood, metal, or concrete and can be finished in a range of colors and styles.
- Cornices: Cornices are decorative elements that project from the top of a building and can be used to add visual interest. They can be made of materials such as wood, stone, or metal and can be finished in a range of colors and styles.
- Moldings: Moldings are decorative bands or shapes that are added to the edges of walls, ceilings, or other surfaces to add visual interest.
- Dentil molding: Dentil molding is a decorative element that consists of a series of small, regularly spaced blocks that resemble teeth. It is often used to decorate the edges of roofs, cornices, or other architectural elements.
- Balustrades: Balustrades are decorative railings that are used to define the edges of balconies, stairways, or other areas. They can be made of materials such as wood, stone, or metal and can be finished in a range of colors and styles.
- Brackets: Brackets are decorative elements that project from walls or other surfaces and can be used to support other architectural elements such as cornices or balconies.
- Column capitals: Column capitals are decorative elements that are added to the tops of columns to add visual interest.
- Pediments: Pediments are triangular decorative elements that are often used to top off walls or other architectural elements.
- Spandrels: Spandrels are decorative elements that fill the space between the arches of a building or other structure.
Using Reference Images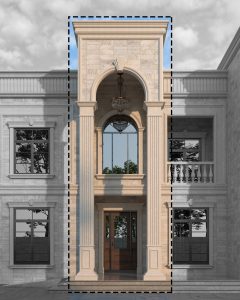

You may want to use reference images to help you get the details right. There are many different types of reference images that you might use, depending on your specific needs and goals, for example:
-
- The Blueprint itself: Blueprints are detailed technical drawings that show the layout and dimensions of a building or other structure. They can be a useful reference when creating a 3D model, especially if you are trying to accurately recreate the layout and dimensions of the building.
- Photographs: Photographs can be a helpful reference when creating a 3D model, as they can provide visual details and context that you might not be able to see in a blueprint. You might use photographs of the exterior or interior of the building, or photographs of specific details such as doors, windows, or decorative elements.
- Historical images: If you are creating a 3D model of a historical building, you might use historical images as a reference. These might include photographs, paintings, or other visual records of the building as it looked at a particular time in the past.
- SketchUp’s 3D Warehouse: The 3D Warehouse is an online library of 3D models that is maintained by SketchUp, the 3D modeling software company. It includes a wide range of models created by users around the world, which you can use as a reference when creating your own model.
Add Exterior Materials and Textures

Finally, add materials and textures to the exterior of the building. This might include brick, siding, and roofing materials. Again, refer to the materials list and reference images to ensure that you are using the correct materials and textures.
Here are a few examples of exterior materials and textures that you might use on a building:
-
-
Brick: Brick is a popular exterior material that is made from fired clay and is available in a range of colors and styles. It can be used to create a variety of textures and patterns, such as running bond, herringbone, and basketweave.
-
Stone: Stone is a natural material that is often used on the exteriors of buildings. It can be used to create a range of textures and styles, including smooth, rough, and polished finishes.
-
Wood: Wood is a natural material that is often used on the exteriors of buildings, especially in traditional or rustic styles. It can be finished in a range of colors and styles, such as natural, stained, or painted finishes.
-
Stucco: Stucco is a plaster-like material that is often used on the exteriors of buildings, particularly in Mediterranean or Southwestern styles. It can be finished in a smooth or textured finish and is available in a range of colors.
-
Siding: Siding is a material that is used to cover the exterior walls of a building and is available in a variety of materials, including vinyl, wood, and metal. It can be finished in a range of colors and styles to suit different design preferences.
-
Roofing: The roof of a building is typically made of materials such as shingles, metal, or clay tiles, which can be finished in a range of colors and styles.
-
Step 3: Adding interior details
With the exterior of the building complete, it’s time to move on to the interior. This includes modeling rooms, hallways, and any other internal spaces. Again, refer to the blueprints for accurate dimensions and details.
To begin, create the basic layout of the interior spaces using simple 3D shapes such as cubes and cylinders. You can use the blueprints as a reference to get the dimensions and proportions correct.
Add in any architectural features
-
Moldings: These intricate, ornate trim pieces add a touch of sophistication and elegance to any space. They can be carved or embossed with delicate patterns, or left smooth and simple for a more modern look.
-
Columns: These stately, vertical structures add a touch of grandeur to any room, drawing the eye upward and imbuing the space with a sense of drama and grandeur.
-
Ceiling medallions: These decorative, circular accents add a touch of glamour and sophistication to any ceiling. Whether intricately carved or simple and sleek, they add a touch of visual interest to an often-overlooked area of the room.
-
Fireplaces: The centerpiece of any room, a fireplace adds warmth, comfort, and a touch of rustic charm.
-
Stairs: A grand, sweeping staircase adds drama and elegance to any home, while a simple, utilitarian set of stairs serves as a functional way to move between levels.
-
Balustrades: These decorative railings add a touch of elegance and refinement to any space. Whether intricate and ornate or sleek and modern, they provide a functional barrier while adding visual interest to the room.
Apply interior materials and textures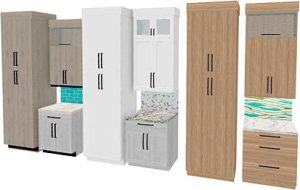

Finally, apply materials and textures to the interior of the building. This might include wallpaper, flooring, and the finishes on surfaces like countertops and cabinets.
-
Wall finishes: From sleek, smooth paint to textured wallpaper, wall finishes provide a canvas for your personal style. Choose a bold pattern to make a statement, or opt for a neutral hue for a more understated look.
-
Flooring: From the warmth and character of wood to the sleek and modern look of tile, flooring sets the stage for any room. One may have a cozy carpet and another a durable stone.
-
Countertops: The perfect blend of function and style, countertops can be as practical as they are beautiful and the choices are practically endless, from concrete, to butcher block, granite, or quartz just to name a few.
-
Cabinets and storage: From rustic, traditional cabinets to sleek, modern storage solutions, these fixtures provide both function and style. Choose a material and finish that fits your personal style and needs, whether it’s practical laminate or luxurious wood.
-
Ceiling finishes: From smooth, painted ceilings to textured plaster, the ceiling is often overlooked but can add a lot of character to a room.
-
Window moldings: Window moldings are decorative elements that are added to the edges of windows to add visual interest and to cover any gaps between the window frame and the surrounding wall. There are many different types of window moldings, each with its own unique characteristics and uses. They can be simple or ornate, depending on the style of the building and the design preferences of the homeowner. Here are a few examples:
-
Casings: Casings are decorative moldings that are used to frame the edges of a window and cover the gap between the window frame and the surrounding wall.
-
Sills: Sills are horizontal moldings that are used to finish the bottom edge of a window and provide a surface for the window to sit on.
-
Aprons: Aprons are decorative moldings that are used to finish the bottom edge of a window and provide a transition between the window and the wall below.
-
Headers: Headers are decorative moldings that are used to finish the top edge of a window and provide a transition between the window and the wall above.
-
Muntins: Muntins are decorative moldings that are used to divide a window into smaller panes, creating a grid-like pattern.
-
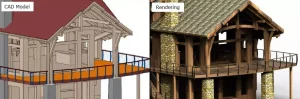 Step 4: Render the model

-
Choose the rendering settings that you want to use for the model. This might include things like the resolution of the final image, the level of detail that you want to include in the model, and the lighting and shading effects that you want to use.
-
Set up any additional details that you want to include in the rendering, such as people, animals, or vehicles. You can either create these details from scratch or import pre-made objects into the model.
-
Choose the camera angle and focal length that you want to use for the rendering. This will determine the perspective and field of view that will be used in the final image or video.
-
Start the rendering process. Depending on the complexity of the model and the chosen rendering settings, this process can take anywhere from a few minutes to several hours or even days.
-
Review the final rendering and make any necessary adjustments. This might involve adjusting the lighting or shading effects, adding or removing details, or changing the camera angle or focal length.
And you’re done!
With a blueprint in hand and a little bit of design software magic, you can transform the flat lines and shapes of a blueprint into a fully realized 3D world.
Imagine stepping into your blueprint and exploring every nook and cranny of your building design, from the cozy living room to the sleek, modern kitchen. With a 3D model, you can see exactly how everything will fit together and make any necessary adjustments before breaking ground.
So why settle for a static blueprint when you can bring your building design to life in vivid, 3D detail? Start turning your blueprints into 3D models today and let your creativity run wild!
Whether you’re an architect, a contractor, or a homeowner, the ability to create a 3D model from a blueprint can help you to better understand the design, identify potential issues, and communicate your vision to others.


